Numbering pages in OpenOffice Writer is essential for organizing and navigating through your document, especially for longer works. Here’s a comprehensive guide to help you insert page numbers into your document in OpenOffice Writer.
1. Access Header/Footer Settings
You can place page numbers in either the header or footer of your document. Click on the “Insert” menu at the top of the screen.
From the dropdown menu, select “Header” or “Footer“, depending on where you want the page numbers to appear.
Choose “Default ” to insert a header or footer into your document.

2. Insert Page Number
Once you have your header or footer set up, click inside the header or footer area to place your cursor there.
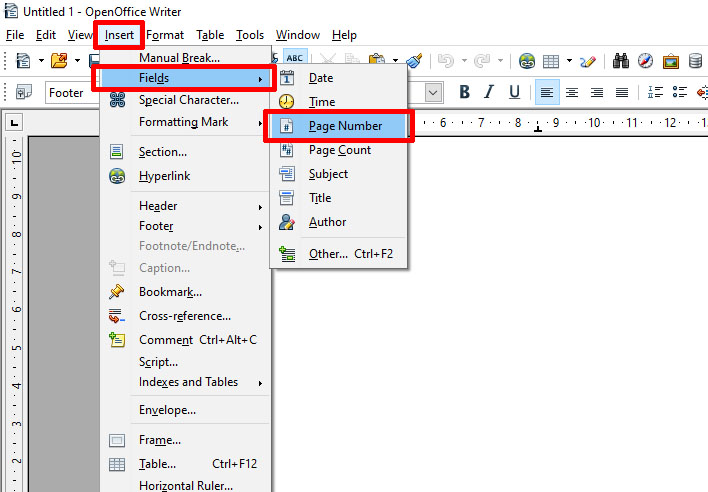
Go to the “Insert” menu again. Select “Fields” from the dropdown menu. Click on “Page Number“. You should now see a page number field in the header or footer of your document.
3. Format Page Numbers
Click on the page number in the header or footer to highlight it. You can then change the alignment (left, center, right) using the standard text alignment buttons on the toolbar. To change the style or format of the page numbers, go to “Format” – “Page“. In the Page Style dialog box, click on the “Footer” or “Header” tab to adjust the style settings.
4. Starting Page Numbers from a Specific Page
If you want to start page numbers from a specific page, such as the second or third page, you need to use page styles and manual breaks: place the cursor at the beginning of the page where you want the page numbers to start.
Go to the “Insert” menu and select “Manual Break” – “Page Break“. In the dialog box, select a different style (you might need to create a new page style for this purpose). Click “OK“.
Now, repeat the steps to insert page numbers in the header or footer of this specific page.
To restart the numbering go to the page where you want to start the numbering. Double-click the header or footer area where the page number is located. Go to the “Insert” menu, select “Fields“, then “Other“.
In the Fields dialog box, go to the “Document” tab, select “Page” from the Type list, choose “Page Numbers” from the Format list, and set the desired starting number in the “Offset” field.
5: Customizing Page Numbers
To further customize page numbers go to the “Insert” menu and select “Fields“, then “Other“. In the Fields dialog box, you can choose different formats for your page numbers, such as Roman numerals, Arabic numbers, etc. Click “Close” after selecting your preferred options.
Adding and customizing page numbers in OpenOffice Writer is a straightforward process that enhances the professionalism and navigability of your documents. By following the steps outlined above, you can easily insert, format, and manage page numbers, ensuring that your document is well-organized and easy to reference.